If the DRY principle (Don't Repeat Yourself) is a core Best Practice in Object-Oriented Programming and software development, is there any way to define common user interface sections of an application in FXML? Can we avoid repeating the work that goes into laying out and controlling sections that are common across across many or even all screens?
It would be beneficial and more consistent if their layout could be defined once and reused wherever necessary. Rather than redefine a menu bar or a collection of buttons on multiple screens, create them once and apply them as needed.
Of course, this approach is nothing new. But as I explored JavaFX as a User Interface toolkit, it was straight-forward how to do this in code, but it was less clear how to do so using FXML.
To speed up user interface development, we want to use the JavaFX layout manager Scene Builder. I am using v8.2 from Gluon - thank you Gluon for backing this important tool!
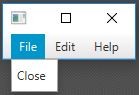
First, let's create a reusable part of our UI. In this example, we will make a MenuBar that will appear on various forms in an application. From a New layout in Scene Builder, expand the Controls section of the Library pane and drag the MenuBar control onto the layout.

This gives us a small MenuBar to start with, pre-populated with a small number of fairly standard Menus and MenuItems. For this exercise, we will keep these, although for the final application, it will be reshaped according to our application's requirements.
Saving this produces an FXML like this:
<?xml version="1.0" encoding="UTF-8"?>
<?import javafx.scene.control.Menu?>
<?import javafx.scene.control.MenuBar?>
<?import javafx.scene.control.MenuItem?>
<MenuBar xmlns="http://javafx.com/javafx/8.0.65" xmlns:fx="http://javafx.com/fxml/1">
<menus>
<Menu mnemonicParsing="false" text="File">
<items>
<MenuItem mnemonicParsing="false" text="Close" />
</items>
</Menu>
<Menu mnemonicParsing="false" text="Edit">
<items>
<MenuItem mnemonicParsing="false" text="Delete" />
</items>
</Menu>
<Menu mnemonicParsing="false" text="Help">
<items>
<MenuItem mnemonicParsing="false" text="About" />
</items>
</Menu>
</menus>
</MenuBar>
Now that we have a MenuBar, we want to apply it to another FXML form created in Scene Builder. So let's create another form (File, New). Then from the Library pane's Controllers, drag an Anchor Pane and a BorderPane to the layout. Save it to a new FXML file.
Scene Builder's File menu has two useful menu items for this exercise: Import and, right below it, Include. They both have matching sub-menus, although interestingly the Include one's sub-menu is disabled until your file has been saved at least once.

Let's take them in top-to-bottom order, starting with the Import menu item. Highlight the BorderPane container and select File, Import, FXML. Then select the menu's FXML file we created earlier. This gives us a form that looks like this:

The result looks good. One minor wrinkle, however. The MenuBar has appeared at the same level in the scene hierarchy as the BorderPane container. But we would rather have the MenuBar be inside the BorderPane, in its Top area. Expand the BorderPane in the hierarchy section and drag the new MenuBar into the TOP section. Save the file. The resulting FXML file looks like this:
<?xml version="1.0" encoding="UTF-8"?>
<?import javafx.scene.control.Menu?>
<?import javafx.scene.control.MenuBar?>
<?import javafx.scene.control.MenuItem?>
<?import javafx.scene.layout.AnchorPane?>
<?import javafx.scene.layout.BorderPane?>
<AnchorPane maxHeight="-Infinity" maxWidth="-Infinity" minHeight="-Infinity" minWidth="-Infinity" prefHeight="400.0" prefWidth="600.0" xmlns="http://javafx.com/javafx/8.0.65" xmlns:fx="http://javafx.com/fxml/1">
<children>
<BorderPane layoutX="14.0" layoutY="14.0" prefHeight="200.0" prefWidth="200.0">
<top>
<MenuBar BorderPane.alignment="CENTER">
<menus>
<Menu mnemonicParsing="false" text="File">
<items>
<MenuItem mnemonicParsing="false" text="Close" />
</items>
</Menu>
<Menu mnemonicParsing="false" text="Edit">
<items>
<MenuItem mnemonicParsing="false" text="Delete" />
</items>
</Menu>
<Menu mnemonicParsing="false" text="Help">
<items>
<MenuItem mnemonicParsing="false" text="About" />
</items>
</Menu>
</menus>
</MenuBar>
</top></BorderPane>
</children>
</AnchorPane>
So it has done just what it said: it imported the FXML from the menu file above, and integrated it into the FXML of the AnchorPane and BorderPane layout structure.
This has lots of potential for sub-dividing development tasks and building up more complex interfaces from simpler components and layouts. But since it has added the MenuBar's FXML directly into this form's FXML, I suspect that its reusability will be limited, in the face of future changes. We will explore that question shortly.
Next, redo the above exercise but use the File, Include menu option. Create a new Scene Builder project (File, New) and drag the AnchorPane and BorderPane onto the Layout area. Save the result, which should be identical to what the Import's example looked like at this stage.
Highlight the BorderPane container in the layout and select File, Include, FXML. Select the menu bar's FXML file created above. As before, the change occurs at the same level in the hierarchy as the BorderPane. Since we want it in the Top section, expand the BorderPane in the hierarchy, and drag the FXML MenuBar onto the Top section.
This creates an immediate difference between the two approaches in the Document Hierarchy section. On the left is the hierarchy created by Import, on the right the hierarchy created by Include.

Note the different icons and text. The Import version, on the left, shows a MenuBar control, just how it would look had we added a MenuBar control through Scene Builder's usual methods. The Include version, on the right, shows some extra icons and calls it an "FXML MenuBar". But the Preview looks just the same. Here is the Preview of the Include version:

The Include's generated FXML is much shorter than with the Import option above, containing just a new fx:include tag in the top section of BorderPane:
<?xml version="1.0" encoding="UTF-8"?>
<?import javafx.scene.layout.AnchorPane?>
<?import javafx.scene.layout.BorderPane?>
<AnchorPane maxHeight="-Infinity" maxWidth="-Infinity" minHeight="-Infinity" minWidth="-Infinity" prefHeight="354.0" prefWidth="451.0" xmlns="http://javafx.com/javafx/8.0.65" xmlns:fx="http://javafx.com/fxml/1">
<children>
<BorderPane prefHeight="200.0" prefWidth="200.0">
<top>
<fx:include source="menu.fxml" />
</top></BorderPane>
</children>
</AnchorPane>
This bodes well. It suggests that we are now reusing a common FXML layout or component. Moreover, we should now be able to make changes to the shared FXML file, and those changes should be carried over or included in all of the places that have included it. Right?
Let's test that: let's add a new MenuItem to one of the Menus in the common MenuBar and see which of these approaches picks it up. Reopen the MenuBar's FXML file and highlight the File menu in the hierarchy. Then from the Menu section of the Library pane, drag a new MenuItem into place. Give it new text, such as "Save" and save the changes. A small change appears in the MenuBar FXML, the File menu section now looks like this:
<Menu mnemonicParsing="false" text="File">
<items>
<MenuItem mnemonicParsing="false" text="Save" />
<MenuItem mnemonicParsing="false" text="Close" />
</items>
</Menu>
Next, return to the Scene Builder instance which used the Include approach. Making no changes, we relaunch the Preview and see that, yes indeed, the changes made to the MenuBar FXML file have automatically been carried forward to this layout.

The Import option, however, is unchanged. Examining the FXML shows that the new MenuItem has not appeared. Previewing the form continues to show the old Menu structure. We could delete the MenuBar and re-import it, a small work-around that accomplishes the same thing. But it comes for free with the Include approach.
From this brief exploration, we can see that both Import and Include have their place in developing applications, depending on how you work and what you are trying to accomplish. Both also work very well in Scene Builder 8.2. I hope that this little exercise is helpful in deciding when and how to use each approach.
It would be beneficial and more consistent if their layout could be defined once and reused wherever necessary. Rather than redefine a menu bar or a collection of buttons on multiple screens, create them once and apply them as needed.
Of course, this approach is nothing new. But as I explored JavaFX as a User Interface toolkit, it was straight-forward how to do this in code, but it was less clear how to do so using FXML.
To speed up user interface development, we want to use the JavaFX layout manager Scene Builder. I am using v8.2 from Gluon - thank you Gluon for backing this important tool!
First, let's create a reusable part of our UI. In this example, we will make a MenuBar that will appear on various forms in an application. From a New layout in Scene Builder, expand the Controls section of the Library pane and drag the MenuBar control onto the layout.
This gives us a small MenuBar to start with, pre-populated with a small number of fairly standard Menus and MenuItems. For this exercise, we will keep these, although for the final application, it will be reshaped according to our application's requirements.
Saving this produces an FXML like this:
<?xml version="1.0" encoding="UTF-8"?>
<?import javafx.scene.control.Menu?>
<?import javafx.scene.control.MenuBar?>
<?import javafx.scene.control.MenuItem?>
<MenuBar xmlns="http://javafx.com/javafx/8.0.65" xmlns:fx="http://javafx.com/fxml/1">
<menus>
<Menu mnemonicParsing="false" text="File">
<items>
<MenuItem mnemonicParsing="false" text="Close" />
</items>
</Menu>
<Menu mnemonicParsing="false" text="Edit">
<items>
<MenuItem mnemonicParsing="false" text="Delete" />
</items>
</Menu>
<Menu mnemonicParsing="false" text="Help">
<items>
<MenuItem mnemonicParsing="false" text="About" />
</items>
</Menu>
</menus>
</MenuBar>
Now that we have a MenuBar, we want to apply it to another FXML form created in Scene Builder. So let's create another form (File, New). Then from the Library pane's Controllers, drag an Anchor Pane and a BorderPane to the layout. Save it to a new FXML file.
Scene Builder's File menu has two useful menu items for this exercise: Import and, right below it, Include. They both have matching sub-menus, although interestingly the Include one's sub-menu is disabled until your file has been saved at least once.

Let's take them in top-to-bottom order, starting with the Import menu item. Highlight the BorderPane container and select File, Import, FXML. Then select the menu's FXML file we created earlier. This gives us a form that looks like this:

The result looks good. One minor wrinkle, however. The MenuBar has appeared at the same level in the scene hierarchy as the BorderPane container. But we would rather have the MenuBar be inside the BorderPane, in its Top area. Expand the BorderPane in the hierarchy section and drag the new MenuBar into the TOP section. Save the file. The resulting FXML file looks like this:
<?xml version="1.0" encoding="UTF-8"?>
<?import javafx.scene.control.Menu?>
<?import javafx.scene.control.MenuBar?>
<?import javafx.scene.control.MenuItem?>
<?import javafx.scene.layout.AnchorPane?>
<?import javafx.scene.layout.BorderPane?>
<AnchorPane maxHeight="-Infinity" maxWidth="-Infinity" minHeight="-Infinity" minWidth="-Infinity" prefHeight="400.0" prefWidth="600.0" xmlns="http://javafx.com/javafx/8.0.65" xmlns:fx="http://javafx.com/fxml/1">
<children>
<BorderPane layoutX="14.0" layoutY="14.0" prefHeight="200.0" prefWidth="200.0">
<top>
<MenuBar BorderPane.alignment="CENTER">
<menus>
<Menu mnemonicParsing="false" text="File">
<items>
<MenuItem mnemonicParsing="false" text="Close" />
</items>
</Menu>
<Menu mnemonicParsing="false" text="Edit">
<items>
<MenuItem mnemonicParsing="false" text="Delete" />
</items>
</Menu>
<Menu mnemonicParsing="false" text="Help">
<items>
<MenuItem mnemonicParsing="false" text="About" />
</items>
</Menu>
</menus>
</MenuBar>
</top></BorderPane>
</children>
</AnchorPane>
So it has done just what it said: it imported the FXML from the menu file above, and integrated it into the FXML of the AnchorPane and BorderPane layout structure.
This has lots of potential for sub-dividing development tasks and building up more complex interfaces from simpler components and layouts. But since it has added the MenuBar's FXML directly into this form's FXML, I suspect that its reusability will be limited, in the face of future changes. We will explore that question shortly.
Next, redo the above exercise but use the File, Include menu option. Create a new Scene Builder project (File, New) and drag the AnchorPane and BorderPane onto the Layout area. Save the result, which should be identical to what the Import's example looked like at this stage.
Highlight the BorderPane container in the layout and select File, Include, FXML. Select the menu bar's FXML file created above. As before, the change occurs at the same level in the hierarchy as the BorderPane. Since we want it in the Top section, expand the BorderPane in the hierarchy, and drag the FXML MenuBar onto the Top section.
This creates an immediate difference between the two approaches in the Document Hierarchy section. On the left is the hierarchy created by Import, on the right the hierarchy created by Include.

Note the different icons and text. The Import version, on the left, shows a MenuBar control, just how it would look had we added a MenuBar control through Scene Builder's usual methods. The Include version, on the right, shows some extra icons and calls it an "FXML MenuBar". But the Preview looks just the same. Here is the Preview of the Include version:

The Include's generated FXML is much shorter than with the Import option above, containing just a new fx:include tag in the top section of BorderPane:
<?xml version="1.0" encoding="UTF-8"?>
<?import javafx.scene.layout.AnchorPane?>
<?import javafx.scene.layout.BorderPane?>
<AnchorPane maxHeight="-Infinity" maxWidth="-Infinity" minHeight="-Infinity" minWidth="-Infinity" prefHeight="354.0" prefWidth="451.0" xmlns="http://javafx.com/javafx/8.0.65" xmlns:fx="http://javafx.com/fxml/1">
<children>
<BorderPane prefHeight="200.0" prefWidth="200.0">
<top>
<fx:include source="menu.fxml" />
</top></BorderPane>
</children>
</AnchorPane>
This bodes well. It suggests that we are now reusing a common FXML layout or component. Moreover, we should now be able to make changes to the shared FXML file, and those changes should be carried over or included in all of the places that have included it. Right?
Let's test that: let's add a new MenuItem to one of the Menus in the common MenuBar and see which of these approaches picks it up. Reopen the MenuBar's FXML file and highlight the File menu in the hierarchy. Then from the Menu section of the Library pane, drag a new MenuItem into place. Give it new text, such as "Save" and save the changes. A small change appears in the MenuBar FXML, the File menu section now looks like this:
<Menu mnemonicParsing="false" text="File">
<items>
<MenuItem mnemonicParsing="false" text="Save" />
<MenuItem mnemonicParsing="false" text="Close" />
</items>
</Menu>
Next, return to the Scene Builder instance which used the Include approach. Making no changes, we relaunch the Preview and see that, yes indeed, the changes made to the MenuBar FXML file have automatically been carried forward to this layout.

The Import option, however, is unchanged. Examining the FXML shows that the new MenuItem has not appeared. Previewing the form continues to show the old Menu structure. We could delete the MenuBar and re-import it, a small work-around that accomplishes the same thing. But it comes for free with the Include approach.
From this brief exploration, we can see that both Import and Include have their place in developing applications, depending on how you work and what you are trying to accomplish. Both also work very well in Scene Builder 8.2. I hope that this little exercise is helpful in deciding when and how to use each approach.